Screens
Screens are the devices that display your content. Each screen runs the Screenflex Player and is linked to a channel, which determines the playlist that will appear on the device. The Screens section allows you to create, organize, and manage all screens connected to your account, whether you are running a single display or a large network across multiple locations.
Screens are the final step in the Screenflex publishing flow—where your content becomes visible to your audience.
What Is a Screen?
A screen represents a physical device running the Screenflex Player.
Each screen:
- Has its own unique name
- Can be tagged and organized
- Is linked to a single channel
- Plays the playlist assigned to that channel
- Uses a unique registration code during setup
Once linked, the screen continuously receives updates whenever its channel, playlist or content changes.
This structure allows you to manage dozens or hundreds of devices without manually updating each one.
Screens Overview Page
The Screens page provides a complete overview of all the devices connected to your Screenflex account. It allows you to monitor status, manage channel assignments, organize screens using tags, and perform quick actions on any device.
When you open the Screens page, you will see three main sections: the header, the tags filter bar, and the screens table.
Header Section
At the top of the page, the header displays:
Screens Title and License InformationYou will see how many player licenses you currently have available. This helps you track device capacity and plan future deployments. A link to contact Sales is provided for additional licenses.
Add Screen ButtonLocated to the right, this button opens the screen creation form where you can add a new device, define its name, location, tags, and assign a channel.
Tags Filter Bar
Below the header, a horizontal filter bar allows you to quickly organize and view screens by tag.
- All — shows the full list of screens.
- Tag badges — each badge represents a tag. Selecting a tag filters the table to show only screens using that label.
- Manage Tags — a link on the right that opens the tag management page where you can add, rename, or remove tags.
Tags help keep large deployments organized, making it easy to categorize screens by location, function, brand, or department.
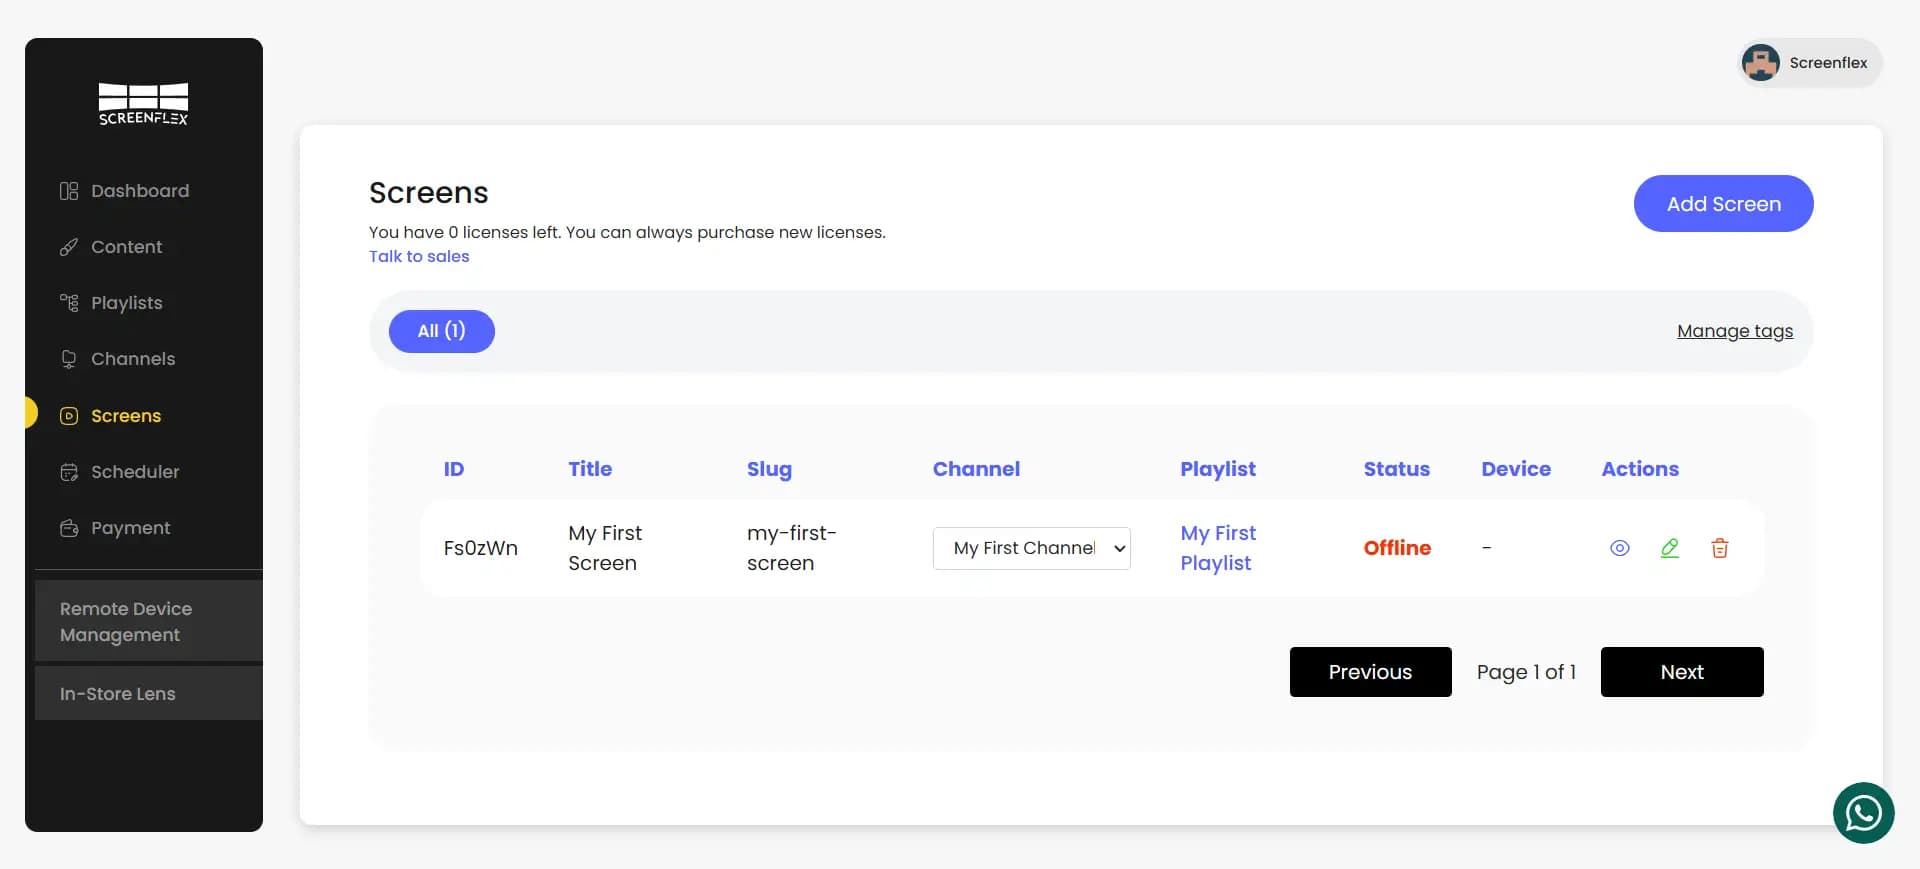
Screens Table
The main area of the page displays the full list of screens in a structured table. Each row represents a screen and includes the following columns:
- ID
A unique identifier automatically generated for each screen.
- Title
The name given to the screen, helping you easily recognize the device (e.g., “Entrance Display”, “Menu Board 2”).
- Slug
A simplified, URL-friendly version of the screen title.
- Channel
A dropdown that lets you assign or change the channel for each screen directly from the table.
Selecting a channel immediately updates what the screen plays.
- Playlist
Displays the playlist currently associated with the screen’s assigned channel.
The playlist name is clickable and opens the playlist in a new tab.
- Status
Shows the real-time connectivity state of the device (e.g., Online or Offline).
Offline screens appear highlighted for quick attention.
- Device
Displays the platform running on the player (e.g., Windows, Android).
A link allows you to view the full device details page.
- Actions
Quick-access icons for:
- View — Opens the screen details.
- Edit — Allows you to modify the screen’s information.
- Delete — Removes the screen after confirmation.
These actions allow administrators to manage screens efficiently without navigating away from the overview.
Pagination
At the bottom of the table, pagination controls allow you to move between pages when managing large deployments. This keeps the interface clean and responsive regardless of the number of screens connected to the system.
Creating a New Screen
To add a new screen, click Add Screen. A creation form appears where you will enter the details of the device.
You will be asked to provide:
- Screen Name
A descriptive name that helps you identify the device—such as “Entrance Display”, “Reception TV”, or “Cafeteria Main Screen”.
- Channel
Select the channel this screen should play.
Once selected, the screen will automatically display the playlist assigned to that channel.
- Screen Tags
Tags help group screens logically.
For example, you may create tags for:
- Locations (“Lobby”, “Floor 2”, “Warehouse”)
- Brands (“LG”, “Samsung”)
- Purposes (“Menu Boards”, “Dashboards”)
Tags are optional but strongly recommended for keeping your deployment organized.
- Screen Location
The physical location where the screen is installed.
This helps you quickly recognize where each display is placed in your environment, especially when managing multiple screens across different areas.
After completing the form, save the screen to add it to your device list.
Registering the Screen in the Player
After creating a screen, the dashboard generates a unique screen code.
This code is used to securely connect the physical device to your Screenflex account.
The setup process is:
- Install and open the Screenflex Player app on your device (Android, Windows, Linux, or Samsung).
- Enter the screen code shown in the dashboard.
- The device links to the screen you created.
- The assigned channel loads and begins playing content instantly.
This pairing system ensures that only authorized devices can join your network.
Editing a Screen
Editing a screen allows you to update its:
- Name
- Tags
- Assigned channel
Any changes you make take effect immediately.
If you switch the assigned channel, the screen will instantly refresh and begin playing the new playlist connected to that channel.
Deleting a Screen
Screens can be deleted at any time using the delete action.
When a screen is deleted:
- It is removed from your account
- The device stops receiving content
- Its registration code becomes invalid
If you want the device to reconnect later, you must create a new screen and register it again using a new code.